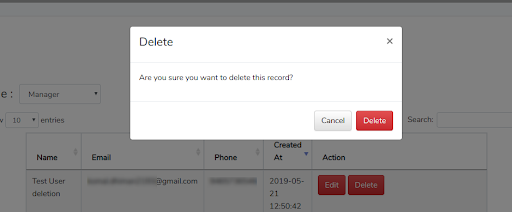
Showing Deletion Confirmation box in Laravel datatables
Datatables are the finest way to show the larger number of records to the user on a single page as it provides so many features like sorting, pagination, etc. Sometimes we need to provide the facility to edit or delete the record from the datatable itself. Then we simply add the action button in the datatable corresponding to each record so that the user can edit or delete that particular record directly from there. Although it is a handy approach from the user point of view, sometimes the user can hit the delete button by mistake or user can accidentally click on the wrong delete button which can cause loss of important data also. Therefore, it is always better to ask user once before performing these kinds of operations to the database.
Let us take an example of datatable of users in laravel.
1. Fetching Users and creating its datatable:
public function fetchUsers($sel_role='manager'){
	try {
 		$users_arr = User::role($sel_role)->get();
		return DataTables::of($users_arr)
			->addColumn('action', function ($user) {
				return '<a href="/editUser/'.Crypt::encrypt($user->id).'" class="btn btn-xs btn-danger"><i class="glyphicon glyphicon-trash"></i> Edit</a>
					<a data-toggle="confirmation" data-singleton="true" data-popout="true" href="/deleteUser/'.Crypt::encrypt($user->id).'" class="delete-user delete btn btn-xs btn-danger"><i class="glyphicon glyphicon-trash"></i> Delete</a>';
		})->make(true);
	} catch (Exception $e) {
		Log::error('Exception in fetching Users --- '.$e->getMessage());
		return Redirect::back()->withErrors('Unable to get user. Please try again later.');
	}
}
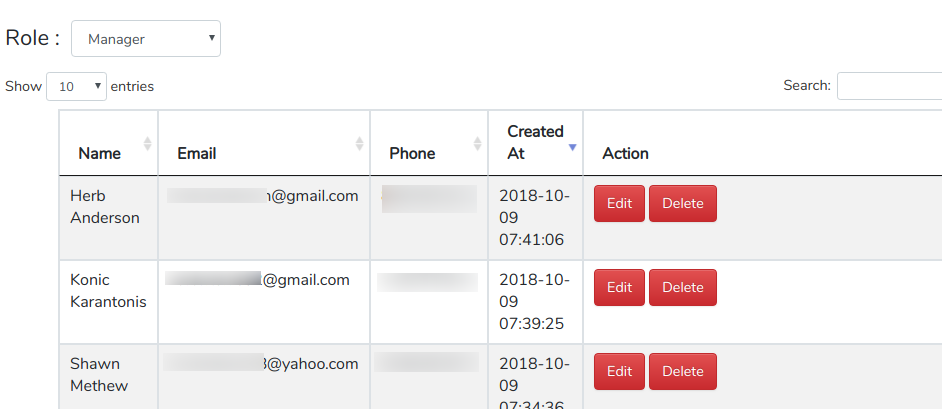
Here, in this code, we are fetching all the users of a particular role and providing edit and delete button to each one to display it in datatable. We are applying delete class to the delete button through class=”delete-user delete btn btn-xs btn-danger” which will be used to attach the confirmation box to it.
Also, data-toggle=”confirmation” is applied to the element that requires confirmation.
2. Showing datatable with javascript:
On the blade file, we write the javascript to show the datatable of users retrieved from the Controller method fetchUsers
<script type="text/javascript">
var users_table;
	$(document).ready(function(){
		users_table = $('#users-table').DataTable({
	        processing: true,
	        serverSide: true,
	        ajax: '/fetchUsers/manager',
	        order: [[ 3, "desc" ]],
	        columns: [
	        	{ data: 'name', name: 'name' },
	        	{ data: 'email', name: 'email' },
	        	{ data: 'phone', name: 'phone' },
	        	{ data: 'created_at', name: 'created_at' },
	        	{ data: 'action', name: 'action', orderable: false, searchable: false },
	        ]
	    });
	});
</script>
This above code will create the datatable of users retrieved from the Controller.
Here, { data: ‘action’, name: ‘action’, orderable: false, searchable: false }, line will create the edit and delete buttons (that we created in the controller along with each user record) to a single column and set searchable and orderable to false because ordering and searching will not be applicable to these buttons.
Show Deletion confirmation model :
Now on click of delete button corresponding to a record, we need to show the modal box that will ask for the confirmation if the user actually wants to delete that record or not. We will do so by the help of bootstrap confirm delete modal box that will also require jquery. Therefore, we need to first include both the jquery and bootstrap in that page and then include this below code in the footer.
$(function() {
$.getScript("https://www.jqueryscript.net/demo/Delete-Confirmation-Dialog-Plugin-with-jQuery-Bootstrap/bootstrap-confirm-delete.js", function(){
	  $('.delete').bootstrap_confirm_delete({
		  heading: 'Delete',
		  message: 'Are you sure you want to delete this record?'
});
	 });
});
Here,
getScript function is getting the script written over that URL and applying it on the page. Basically, it uses a Bootstrap plugin that provides the confirmation feature. “Bootstrap_confirm_delete” is the function in that plugin that takes the parameters like the heading of modalbox, message, etc. We are calling bootstrap_confirm_delete function on the element having class .delete which we have already added to each delete button in the Controller method. It will show a modal like in the screenshot below on click of each delete button. If the user will click on ‘Delete’ only then it will take that action otherwise it will cancel the operation.