What is Visual Composer and how to use it in WordPress?
Visual composer is a WordPress plugin that permits you to drag and drop components to create and edit your WordPress website. You can simply add new text blocks, buttons, images, etc. Simply drag the element to the page and then adjust the properties to your liking.
It is developed by a third party but integrates well with our themes and plugins. The Visual Composer plugin can be used to edit or create content on your page, not to edit components that are a part of the theme.
How do I install the plugin?
Visual composer is accessible for installation from the One.com parent plugin.
- Open your WordPress dashboard.
- Click the One.com plugin in the menu to the left and open the plugin tab.
- On Visual Composer click Install and then Activate.
- On the next screen, select a category, check the box to agree to the terms and click Activate Now.
How Visual Composer Works? And What It Will Do?
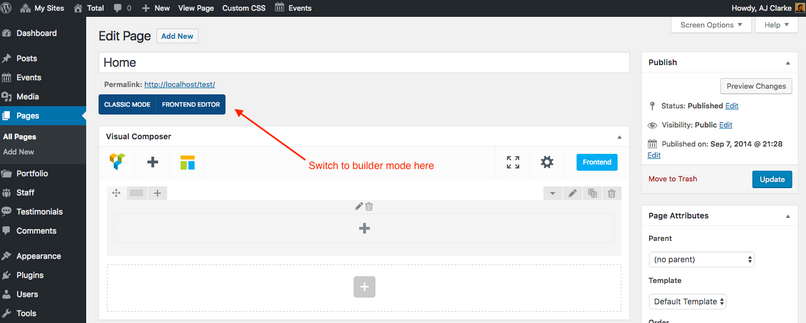
It’s a plugin, so just install and activate to take advantage of all it’s wonderful features. Once activated, the Visual composer provides you management over the layout of your pages. Just add a brand new page and you’ll see new buttons in order that you’ll be able to toggle between classic mode and builder mode similarly as a button to get you to the live front-end editor.
From here the possibilities are only limited by your thoughts. You can add rows, columns, buttons, text, images and much more from all of the Visual Composer’s options. Plus there’s an option to save your layouts as a template to be reused over & over again.
Page Elements
Included in the builder are page building elements. You can use these components as literal building blocks for your page. First, add a Row and an element. Rows make it possible to add columns in one click. Just hover on the yellow paragraph tab at the highest left corner of your row and choose a layout. The row automatically breaks into columns consistent with the layout you select.
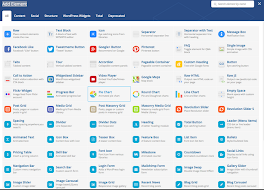
The next thing is to start attaching your page features. Just click the Add Element button to open a pop-up menu. There are lots of choices like text boxes, headings, social sharing, images and galleries, toggles or tabs, accordions, recent posts buttons, and sidebar widgets.
Drag & Drop
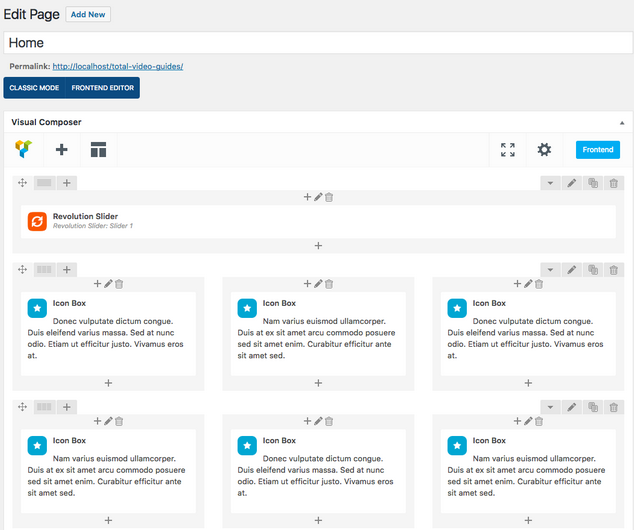
At any point within the style method, you’ll be able to drag & drop any row or page component to set up them. You can also duplicate any row or component, that makes adding repetitive content fast and simple.
Once you’ve created a style you like you’ll save it as an example. This comes in handy when creating a custom page layout or sidebar you’d like to reuse. Just click on the Templates button, give your layout a name, and hit save. When you use your template it will automatically populate your page with the layout and elements you saved.
Visual Composer Settings Options
I keep referring to the Visual Composer as a page builder, but it works great with posts and custom post types as well. You just need to enable the option. Navigate to Settings > Visual Composer. You should see a screen similar to this:
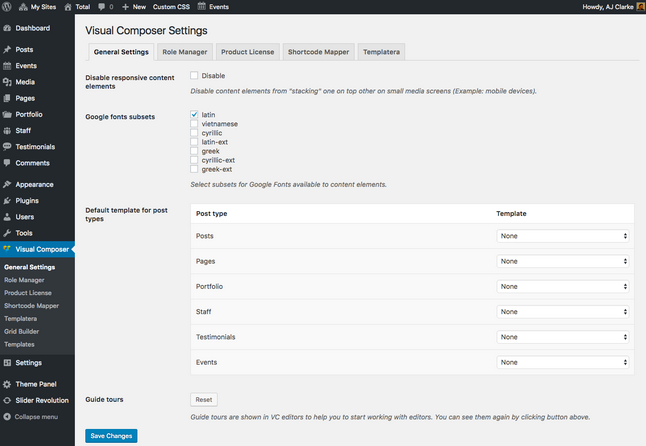
The plugin will automatically display the various content types included in your WordPress theme. Just choose the one with which you’d like to use the Visual Composer page builder. The example above is from our Total theme, which is why there are added options for the portfolio, staff, and testimonials as well as forums, topics, reply, and products.