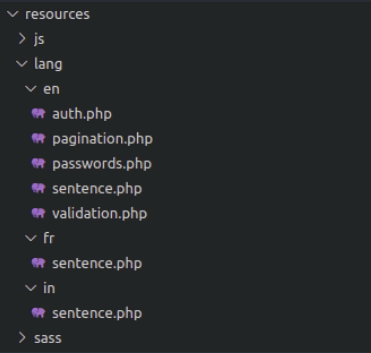
Laravel has made it convenient for the developers to create multilingual websites by giving the developer community an easy way to retrieve strings in various languages. These strings are basically stored as constants in the resources/lang directory within our project. Within the lang directory, there are subdirectories of the specific languages that one website will provide.
Prerequisites:
For this project, we are taking into consideration that composer and other Laravel related prerequisites have been properly set up in your systems.
-
Creating a Laravel project: We will be creating a laravel project using the composer by using the following command from the command prompt or terminal based on the OS you are using.
composer create-project laravel/laravel localization - Creating Language Sub-directories: Go to the resource/lang directory and you will see a folder named en, this represents support for language English, which is set to default. Create folders inside the resource/lang directory and name it as fr and in. In this example, we will be handling the queries for the French language as the local language. So, we have named the folder as fr. Now inside the language folder, add a folder named sentence.php file.

One can add as many texts as per the requirements or string that have been used. For this example, I have added only two languages. (Do same for in)
For fr – sentence.php
<?php
// sentence.php
return [
‘welcome’ => ‘Bienvenue mon ami’
];For in – sentence.php
<?php
// sentence.php
return [
‘welcome’ => ‘आपका स्वागत है दोस्त’
];Now, we have created the translation files. Keep in mind that the keys used in these files should be the same, as they will be loaded onto the blade (view) files in the project.
-
Setting Up Blade Files: As soon as the translation files are ready, let’s start creating the blade files. First, create a layout folder inside the resources/views folder, and inside the folder create a blade file of the name – app.blade.php
<!DOCTYPE html>
<html lang="{{ str_replace('_', '-', app()->getLocale()) }}">
<head>
<meta charset="utf-8">
<meta name="viewport" content="width=device-width, initial-scale=1">
<meta name="csrf-token" content="{{ csrf_token() }}">
<title>{{ config('app.name', 'Laravel') }}</title>
<script src="{{ asset('js/app.js') }}" defer></script>
<link rel="dns-prefetch" href="//fonts.gstatic.com">
<link href="https://fonts.googleapis.com/css?family=Nunito" rel="stylesheet" type="text/css">
<link href="{{ asset('css/app.css') }}" rel="stylesheet">
</head>
<body>
<div id="app">
<nav class="navbar navbar-expand-md navbar-light navbar-laravel">
<div class="container">
<a class="navbar-brand" href="{{ url('/') }}">{{ config('app.name', 'Laravel') }}</a>
<button class="navbar-toggler" type="button" data-toggle="collapse" data-target="#navbarSupportedContent" aria-controls="navbarSupportedContent" aria-expanded="false" aria-label="{{ __('Toggle navigation') }}">
</button>
<div class="collapse navbar-collapse" id="navbarSupportedContent">
<ul class="navbar-nav mr-auto">
</ul>
<ul class="navbar-nav ml-auto">
@php $locale = session()->get('locale'); @endphp
<li class="nav-item dropdown">
<a id="navbarDropdown" class="nav-link dropdown-toggle" href="#" role="button" data-toggle="dropdown" aria-haspopup="true" aria-expanded="false" v-pre>Language </span></a>
@switch($locale)
@case('fr')
<img src="{{asset('fr.png')}}" width="30px" height="20x"> French
@break
@case('in')
<img src="{{asset('in.png')}}" width="30px" height="20x"> Hindi
@break
@default
<img src="{{asset('us.png')}}" width="30px" height="20x"> English
@endswitch
<div class="dropdown-menu dropdown-menu-right" aria-labelledby="navbarDropdown">
<a class="dropdown-item" href="lang/en">}}) English</a>
English</a>
<a class="dropdown-item" href="lang/fr">}}) French</a>
French</a>
<a class="dropdown-item" href="lang/in">}}) Hindi</a>
Hindi</a>
</div>
</li>
</ul>
</div>
</div>
</nav>
<main class="py-4">
@yield('content')
</main>
</div>
</body>
</html>Now, you will see a blade file with the name welcome.blade.php will already be placed inside the same view folder. Open the same and include a markup for language dropdown.
@extends('layouts.app')

@section('content')

<div class="container">

    <div class="row justify-content-center">

        <div class="col-md-8">

            <div class="card">

                <div class="card-body">

                <p>{{ trans('sentence.welcome')}}</p>

                </div>

            </div>

        </div>

    </div>

</div>

@endsection
Here, I have used the trans() function which will take one argument, and it is the filename.array_key_name. - Setting Up Route File: Inside the route/web.php add the following route
Route::get('lang/{locale}', 'HomeController@lang'); -
Creating Controller File: Run artisan command to create Controller –
php artisan make:controller HomeController
Write the following code inside the controller file created inside app/Http/Controller directory.
<?php

// HomeController.php

namespace App\Http\Controllers;

use Illuminate\Http\Request;

use App;

class HomeController extends Controller

{

    public function lang($locale)

    {

        App::setLocale($locale);

        session()->put('locale', $locale);

        return redirect()->back();

    }

}
This function will set up the local and put the same inside the session - Creating Middleware: Creating middleware is the main part of our functionality. Run the below command to create a middleware file named Localization.
php artisan make:middleware Localization
This will create a file inside the app/Http/Middleware folder and update the handle method with below code
<?php

// Localization.php

namespace App\Http\Middleware;

use Closure;

use App;

class Localization

{

    /**

     * Handle an incoming request.

     *

     * @param  \Illuminate\Http\Request  $request

     * @param  \Closure  $next

     * @return mixed

     */

    public function handle($request, Closure $next)

    {

        if (session()->has('locale')) {

            App::setLocale(session()->get('locale'));

        }

        return $next($request);

    }

}
After creating the middleware, register the same in the App\Http\Kernel‘s protected $middlewareGroups array as below –
\App\Http\Middleware\Localization::class,
OUTPUT

