RabbitMQ
RabbitMQ is an open-source message broker. It supports multiple messaging protocols. It was originally developed to support AMQP 0-9-1 protocol ( Advanced Message Queuing Protocol which is a messaging protocol that enables conforming client applications to communicate with conforming messaging middleware brokers ). This protocol is considered a “core” protocol supported by the broker. It also supports STOMP, MQTT, AMQP 1.0 & HTTP and WebSockets using plugins. It runs on many operating systems and cloud environments, and it also provides a wide range of developer tools for most popular languages.
It accepts, stores & forwards binary blobs of data-messages.
Steps to Install RabbitMQ using official its installer on Windows:
RabbitMQ installer has a dependency that requires a 64-bit supported version of Erlang for Windows to be installed. So first we are going to install the Erlang.
- Download file from URL → http://erlang.org/download/otp_win64_22.2.exe
- Run the downloaded Erlang executable file it will install the Erlang
-
Now Go to Start → Settings → Control Panel → System → Advanced → Environment Variables.
We need to create a system environment variable ERLANG_HOME and set it to the full path of the directory which contains bin\erl.exe as shown below.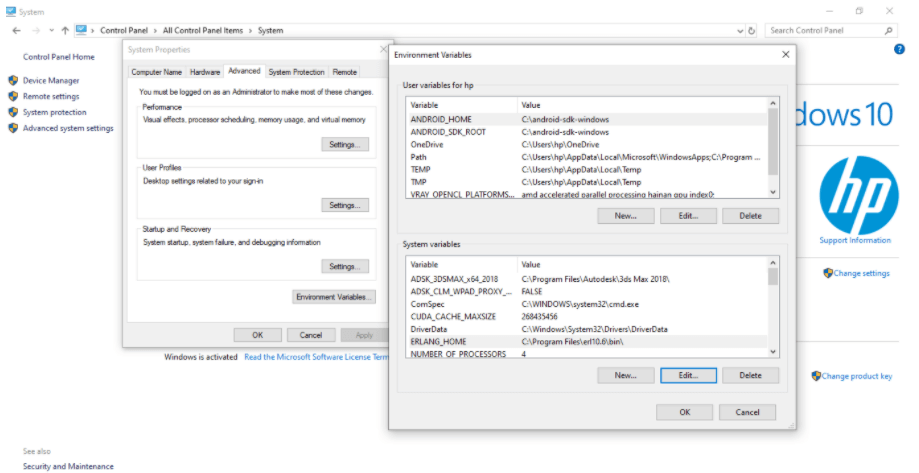
After the successful installation of Erlang, we will install the Rabbit MQ Server.
Install RabbitMQ Server:
-
Download file from this URL →
Rabbit MQ server 3.8.2.exe - Now run the downloaded RabbitMQ Server file. It will install the RabbitMQ Server.
Install php-amqplib client library:
- Open the folder in the command prompt or power shell where your project resides.
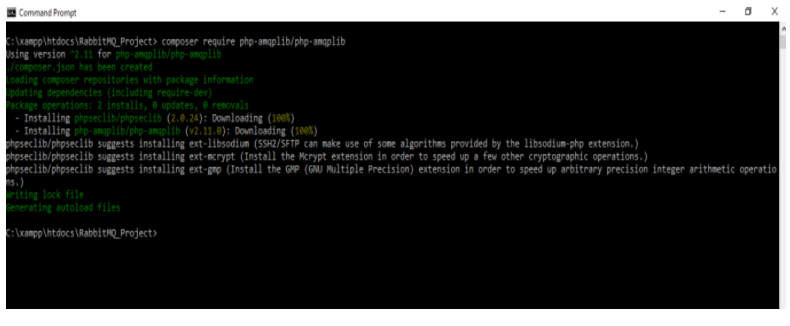
(like in my case it is → C:\xampp\htdocs\RabbitMQ_Project ) - Now run the following command to install the php-amqplib using composer:
composer require php-amqplib/php-amqplib - The output will be like below →
Now we are done with the installation & environment setup for RabbitMQ to send & receive messages.
Here are some important terms used in RabbitMQ:
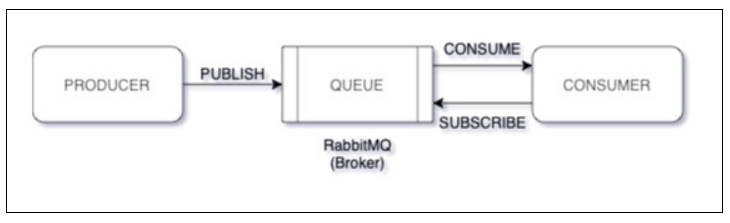
Publisher: A program that sends messages is called Publisher.
Queue: Buffer that stores messages.
Consumer: A program that receives messages is called Consumer.
EXAMPLE
Now we will create a simple “Hello World” project in which we’ll write two programs in PHP; a producer that sends a single message, and a consumer that receives messages and prints them out.
-
Create a file : send.php and paste the below code in a blank file.
<?php

    require_once __DIR__ . '/vendor/autoload.php';

    use PhpAmqpLib\Connection\AMQPStreamConnection;

    use PhpAmqpLib\Message\AMQPMessage;

    $connection = new AMQPStreamConnection('localhost', 5672, 'guest', 'guest');

    $channel = $connection->channel();

    $channel->queue_declare('hello', false, false, false, false);

    $msg = new AMQPMessage('Hello World!');

    $channel->basic_publish($msg, '', 'hello');

    echo " [x] Sent 'Hello World!'\n";

    $channel->close();

    $connection->close();

?> -
Create another file receive.php and paste the below code in the same
<?php

    require_once __DIR__ . '/vendor/autoload.php';

    use PhpAmqpLib\Connection\AMQPStreamConnection;

    $connection = new AMQPStreamConnection('localhost', 5672, 'guest', 'guest');

    $channel = $connection->channel();

    $channel->queue_declare('hello', false, false, false, false);

    echo " [*] Waiting for messages. To exit press CTRL+C\n";

    $callback = function ($msg) {

         echo ' [x] Received ', $msg->body, "\n";

    };

    $channel->basic_consume('hello', '', false, true, false, false, $callback);

    while ($channel->is_consuming()) {

        $channel->wait();

    }

?> - Now, go to start menu and click on: RabbitMQ Service – start
- Now the RabbitMQ service is started. Run the PHP files in different command prompt to test the output:
