Integrate Razorpay in CakePHP application
Step 1: Create Razor Pay Account
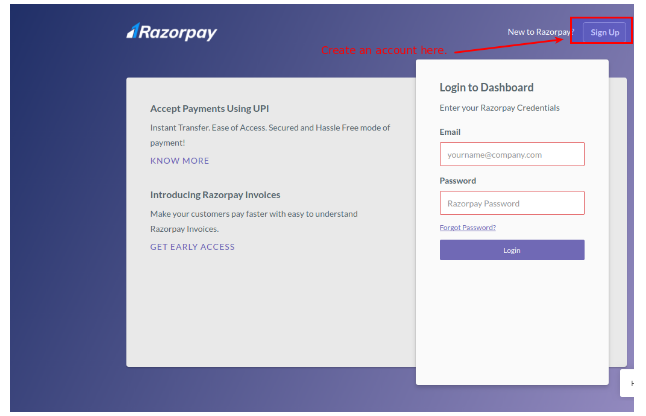
First of all you need a test account for Razorpay integration. Click the below link https://dashboard.razorpay.com/#/access/signup and set up a test account there:
Step 2: Get your API Keys:
After successful login, you will see your dashboard. In the dashboard click on the “Settings Tab” on the left hand side navigation bar:
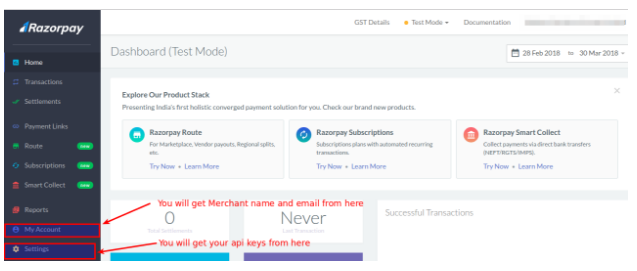
When you click on the settings tab you will see below screen:
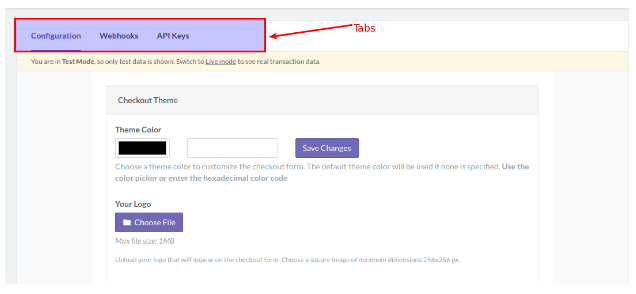
There are three tabs. Go to the API Keys tab and get your keys from there. You can also download your keys in a csv file. Razorpay allowes Test/Live both type of accounts. Select the appropriate mode type for which you need api keys:

Step 3: Get Payment Token:
Add below script to your form:
<div id="razorPayment">
<form action="RETURN_URL" method="POST">
<script src="CHECKOUT_URL"
data-key="API_KEY>"
data-amount="TOTAL_AMOUNT"
data-buttontext="Pay with Razorpay"
data-name="MERCHANT_NAME"
data-description="Purchase Description"
data-prefill.name="USER_NAME"
data-prefill.email="USER_EMAIL">
</script>
</form>
RETURN_URL – url where you want to return after payment done by Razorpay.
API_KEY – your api keys provided by Razor pay
CHECKOUT_URL – the main razorpay script which will generate the token for you.(https://checkout.razorpay.com/v1/checkout.js)
TOTAL_AMOUNT- total payment amount (in paise) only. (Razor pay only supports INR (Indian) currency. If you want to pay for dollar or some other currency, first you need to convert that amount to Paise).
MERCHANT_NAME- the name you have added while creating merchant account. You will get it from “My Account” tab in the navigation bar.
USER_NAME, USER_EMAIL – username and email who is going for payment.
If all the parameters supplied by you are good, then you will get payment token as response.
Note:
If you are providing any description then the maximum limit of the description is 5000 characters. If you send more than this then it will return error.
Also amount should be greater than zero for a successful payment.
Step 4: Capture/Process payment (I have used it with cake2):
Now you can use this token to capture payment in your php script. Import below library at the top
App::uses(‘HttpSocket’, ‘Network/Http’);
Create a method in your controller and add below code to it:
$socket = new HttpSocket();
$socket->configAuth('Basic', Configure::read("RAZOR_API_KEY"), Configure::read("RAZOR_KEY_SECRET"));
$data = array('amount' => $amount);
$payment_id = $_REQUEST["razorpay_payment_id"];
$paymentResponse = $socket->post(Configure::read("RAZOR_PAYMENT_URL"). $payment_id.'/capture',$data);
Description:
RAZOR_API_KEY, RAZOR_KEY_SECRET – your api credentials.
$_REQUEST[“razorpay_payment_id”] – your payment id that you have received in step 3.
RAZOR_PAYMENT_URL – payment url provided by Razor and common to all (https://api.razorpay.com/v1/payments/).
Now you can investigate the response to check whether payment is successful or not. You can check this by using below syntax:
$paymentResponse>code
If you get response code “200” it means everything is fine.
What is mandatory to get a live account from Razor Pay?
Your website should have:
1. Terms of service page.
2. Pricing page.