Problem: Document Your API with “Doxygen Tool” | SOAP web services using spring jax-ws package (ubuntu 14.04)
Solution: Documenting any API is prerequisite if we are exposing our api web services to the third party to make them easily understandable to the outside world. Documenting api is time consuming process.To make it easier, there are many tools available in the market which makes our task easy to go. I am describing here one of them named “Doxygen”.
Two main steps to use Doxygen:
a.) Install Doxygen
b) Use comments format provided by Doxygen to auto generate documentation using those comments.
a) Install Doxygen:
Go to ubuntu terminal and run below command to install doxygen:
sudo apt-get install doxygen
2) Now create a directory inside /opt folder with any name, I have used below command:
mkdir  doxygen_documentation
cd   doxygen_documentation
3) We need a project specific configuration file where we can specify the api url to document our source code. Run below command:
doxygen -g your_project_name.conf
4) Open your your_project_name.conf file in the editor and do below changes:
# The PROJECT_NAME tag is a single word (or a sequence of words surrounded by
# double-quotes, unless you are using Doxywizard) that should identify the
# project for which the documentation is generated. This name is used in the
# title of most generated pages and in a few other places.
PROJECT_NAME = “Sample Test Project” //add your project name here
# document all entities in the project.
EXTRACT_ALL = YES
# document all static members of a file.
EXTRACT_STATIC = YES
# specify the root directory that contains the project’s source files. As I have added a //demo spring JAX-WS web project to create WSDL based web services I have typed the //my project root folder path below. You can add here accordingly
INPUT = /home/user/workspace/demoProject
# search sub-directories for all source files.
RECURSIVE = YES
# include the body of functions and classes in the documentation.
INLINE_SOURCES = YES
# generate visualization graph by using dot program (part of graphviz package).
HAVE_DOT = YES
You will get some of the above properties in your config file with value “NO”. Change “NO” to “YES” and save your file. Your api should be published on the url that you have entered in the file.
5) Run below command to auto generate documentation:
Command : doxygen your_project_name.conf
After running below command you will see two new folder named “html” and “latex”.
Go to html folder and open index.html file in your browser.

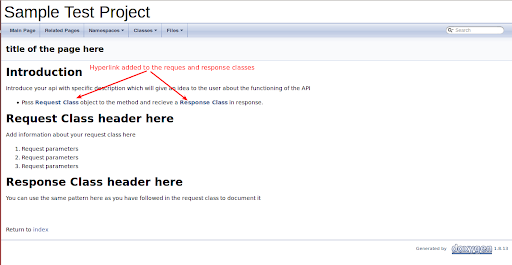
Fig 1 : index.html in browser
You will see your project name specified in the configuration file at the top of the page. And below these, there are number of tabs like “Main Page”, “Related Pages” ,“Namespaces”, “Classes”, “Files”. Each of these tabs will contain your documented api, their methods, request and responses as you have specified in api comments.
b) Comment your Source Code :
Go through the below links to add comments to your code :
https://www.stack.nl/~dimitri/doxygen/manual/commands.html
Here you will get all the commands with their meaning described.
Let’s have an example :
Below is the sample page which will be available under “Related pages” header in the output. I have highlighted all the necessary keywords which has special meaning in the output.
/*!
* \page title of the page here
* @section intro_sec Introduction
* Introduce your api with specific description which will give an idea to the user about the
* functioning of the API
** Pass Request Class \ref com.mm.api.calls.requests.updateCustomerTestRequest object to the method and receive a responseClass \ref com.mm.api.calls.responses.UpgradeCustomerTestResponse in response.
* @section sec1 Request Class header here
* Add information about your request class here
       <ol>
    <li>request parameters</li>
     <li>request parameter</li>
  </ol>
* You can add as many as u want
* @section sec2 Response class header here
* You can use the same pattern here as you have followed in the request class to document it.
*/
Explanation:
/*! – Beginning of the commnet
*/ – end of the comment
\page – to create a new page which will be available under “Related Pages” header
@section- To create different sections in your page. Sec1, sec2 are the names of the section and it should be unique in the whole page.
\ref – used to create hyperlinks. If you want to link your request class, then follow below syntax:
“{Hyperlink text you want to show}” \ref “{class name}” with package details.
For eg:
Update customer request \ref com.test.api.calls.requests.UpdateCustomerRequest
Hyperlink text – text which will be available to user.
After using above format, you will see a new page in your documentation as added below: