Swagger is a very powerful tool to generate documentation of your Rest based web services API containing Spring annotations. You don’t need to add any type of comments to your code to generate documentation. It will pick the Spring annotations and will generate the documentation for you. Below are the steps that you have to follow to document your api with Swagger :
1. Add below specified maven dependencies to your project :
<dependency>
<groupId>io.swagger</groupId>
<artifactId>swagger-core</artifactId>
<version>${swagger.core}</version>
</dependency>
<dependency>
<groupId>io.swagger</groupId>
<artifactId>swagger-annotations</artifactId>
<version>${swagger.annotation}</version>
</dependency>
<dependency>
<groupId>io.springfox</groupId>
<artifactId>springfox-swagger2</artifactId>
<version>${springfox.swagger.version}</version>
</dependency>
<dependency>
<groupId>io.springfox</groupId>
<artifactId>springfox-swagger-ui</artifactId>
<version>${springfox.swagger.version}</version>
</dependency>
Version specified inside maven properties element in the POM file :
<springfox.swagger.version>2.6.1</springfox.swagger.version>
<swagger.annotation>1.5.9</swagger.annotation>
<swagger.core>1.5.10</swagger.core>
<spring.version>4.0.4.RELEASE</spring.version>
<hibernate.version>4.3.5.Final</hibernate.version>
2. Add SwaggerConfiguration.java( you can use any class name) class to your project and add below code to it :
import org.springframework.context.annotation.Bean;
import org.springframework.context.annotation.Configuration;
import springfox.documentation.builders.PathSelectors;
import springfox.documentation.builders.RequestHandlerSelectors;
import springfox.documentation.spi.DocumentationType;
import springfox.documentation.spring.web.plugins.Docket;
import springfox.documentation.swagger2.annotations.EnableSwagger2;
@Configuration
@EnableSwagger2
public class SwaggerConfiguration {
@Bean
    public Docket api() {
        return new Docket(DocumentationType.SWAGGER_2).select().apis(
           RequestHandlerSelectors.any()).paths(PathSelectors.any()).build();
    }
}
3. Match you application.xml file with content below and if anything is missing add it to your file :
<beans xmlns="http://www.springframework.org/schema/beans"
xmlns:context="http://www.springframework.org/schema/context"
xmlns:mvc="http://www.springframework.org/schema/mvc" xmlns:xsi="http://www.w3.org/2001/XMLSchema-instance"
xsi:schemaLocation="
        http://www.springframework.org/schema/beans
        http://www.springframework.org/schema/beans/spring-beans-3.0.xsd
        http://www.springframework.org/schema/context
        http://www.springframework.org/schema/context/spring-context-3.0.xsd
        http://www.springframework.org/schema/mvc
        http://www.springframework.org/schema/mvc/spring-mvc-3.0.xsd">
<context:component-scan base-package="add your base package here" />
<context:annotation-config />
<mvc:annotation-driven />
<mvc:resources mapping="swagger-ui.html"   location="classpath:/META-INF/resources/" />
<mvc:resources mapping="/webjars/**" location="classpath:/META-INF/resources/webjars/" />
</beans>
4. After completing above changes, compile and deploy your project.
Type url : https://your api url /swagger-ui.html , You will see the swagger api interface as below :
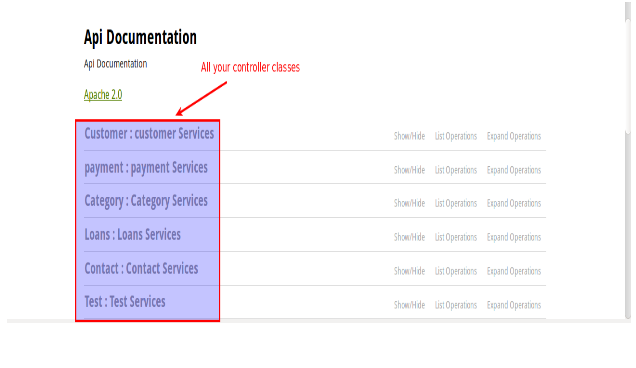
All the above controller classes will be represented here and hyperlinked to the methods defined in the respective controller class.
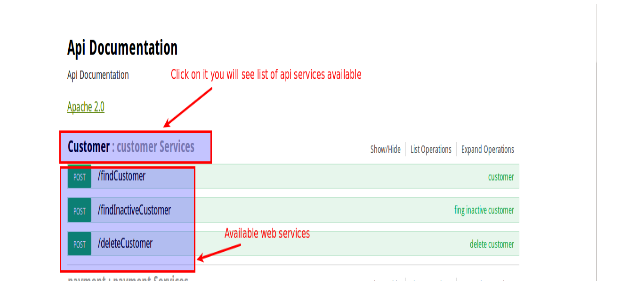
For example, customer Services.( for me), on clicking it you will see all its methods :