Steps to write code to send text message by Alexa through Twilio
Alexa is Amazon’s cloud-based voice service. With Alexa, masses can build natural voice experiences that offer customers a simple and easy way to interact with the latest technologies.
Alexa is not providing any way out to send message by custom skill. So, In the following paragraphs I will describe that how can we send messages through alexa skill by using third party tool which is Twilio.
To send messages by Alexa, Dialog.Directive are used to carry out multiple steps in the exchange between human and Alexa.
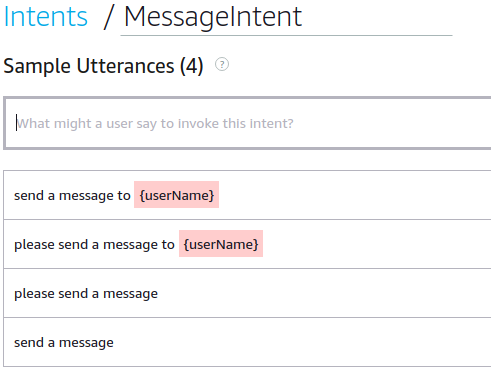
To commence with, open your skill from your developer account of alexa and create an intent like “MessageIntent”. Then, add utterances for this slot which means that how end user can call this intent.
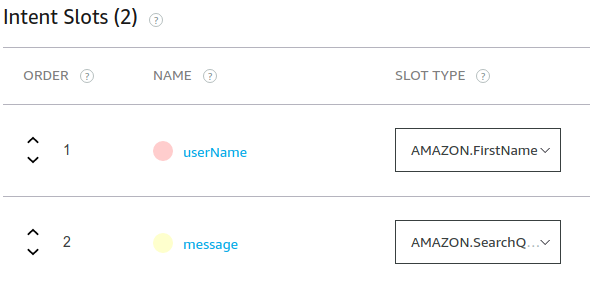
{userName} is a slot type. Choose Amazon.FirstName build in slot type to get person’s first name. Additionally, message slot is needed to get the message text so for this choose Amazon.SearchQuery slot.
To use any of the Dialog directives, you must create a dialog model. Below are the steps for it:
– The slots that must be filled with valid values in order to fulfill the intent. These are considered as required slots.
– The prompts Alexa speaks to, asks for required slot values and the utterances users can say in reply.
– Confirmation of slots:
– Whether any of the required slots must also be confirmed by the user before continuing.
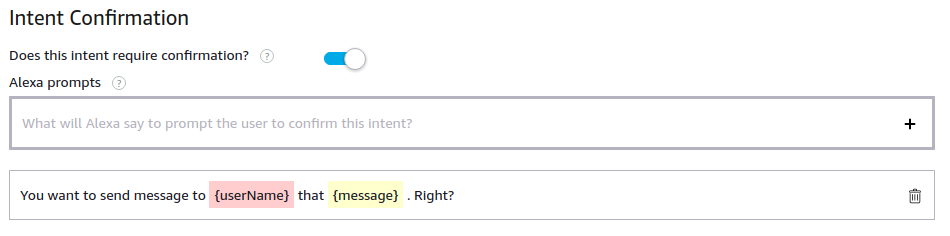
– Whether the entire intent must be confirmed by the user before continuing.
The prompts Alexa speaks to ask for slot and intent confirmations.
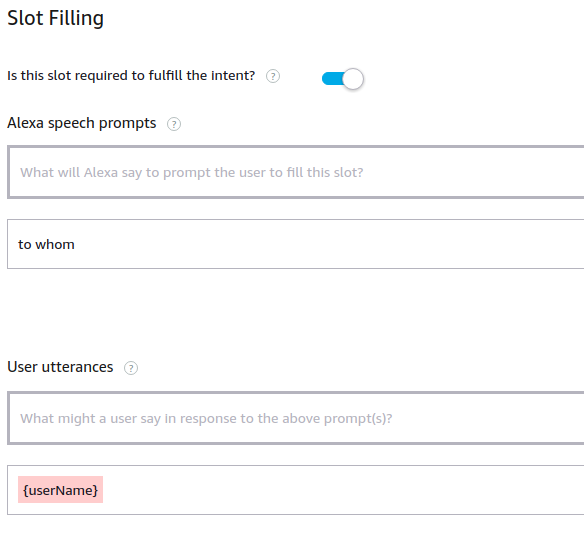
{userName} slot dialog screen:
– Slide the required slot slider button.
– Add utterance in alexa speech prompts means what will alexa speak if user didn’t provide user name while invoking the message intent.
– Add utterance (for user that user will speak in response) in user utterance box.
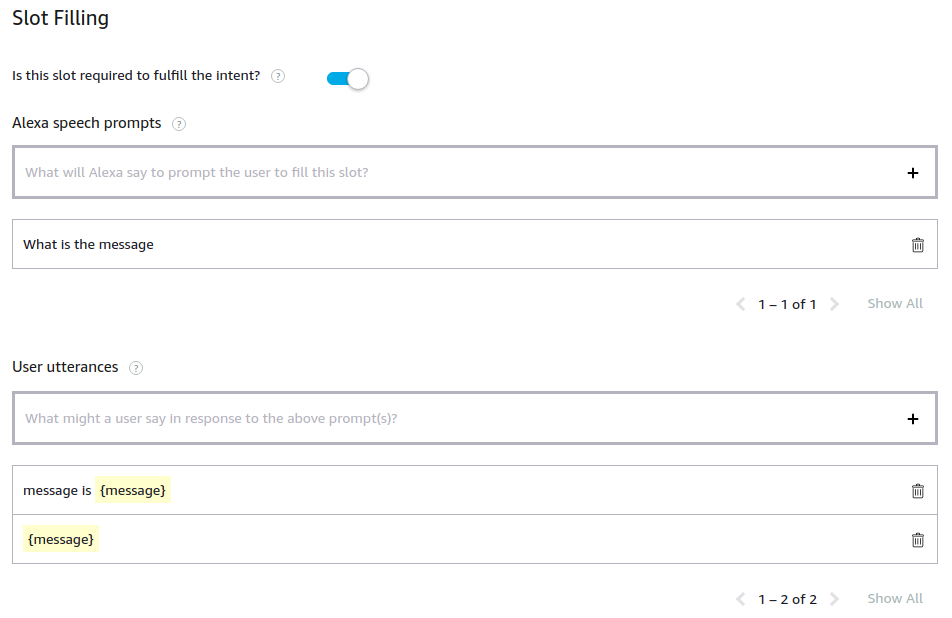
{message} slot dialog screen:
– Slide the required slot slider button.
– Add utterance in alexa speech prompts means what will alexa speak after getting the username to get message slot value.
– Add utterance (for user that user will speak in response) in user utterance box.
After getting both slot values, intent confirmation will be set to required. And confirm the all slot before continue.
On the other hand, in web service (laravel project), add a new route in api.php file.
AlexaRouter::intent ( ‘/
In controller file, add below function:
/**
 * Alexa Message intent request.
 *
 * @var alexa request data
 *
 * @return json
 */
function alexaMessage(AlexaRequest $alexarequest) {
	Log::info ( "Message request intent");
	$result = $this->tokenVerify ( $alexarequest );
	if (! $result) {
		Log::info('Token is not matched.');
		return $this->tokenNotMatched ();
	} else {
		Log::info('Token is matched.');
		Log::info ( 'userid:' . serialize ( $result ['user_id'] ) );
		$dialogState = $alexarequest->dialogState();
		if($dialogState == 'COMPLETED'){
			Auth::loginUsingId ( $result ['user_id'] );
			$user = Auth::user();
			$userId = $user->id;
			$userType = $user->type;
			$userName = $user->first_name;
			$userNumber = DB::table('user_profile')->select('country_code','mobile_number')->where('name',  $alexarequest->slot('userName'))->get();
			$userNumber = $userNumber->toArray();
			Log::info ( 'userNumber:' . serialize ( $userNumber ) );
			if($userNumber[0]->mobile_number !="" || $userNumber[0]->country_code !=""){
				$userNumber = $userNumber[0];
				$callerPhoneWithCode = '+'.$userNumber->country_code.''.$userNumber->mobile_number;
				$client = new Client(<SID>, <TOKEN>);
				$message = $client->messages->create($callerPhoneWithCode,
						array(
							'body' => $alexarequest->slot('message'),
							'messagingServiceSid' => '<messagingServiceSid>',

						)
						);
				$message = $message->sid;
				Log::info('Message id:'.$message);
				$alexaResponse = new AlexaResponse();
				$alexaResponse->withSpeech(new Speech("$userName, Message is sent successfully."));
				$alexaResponse->endSession('false');
				return $alexaResponse;
			}else{
				Log::info("Message request intent response: $userName, please enter your phone number in your account.");
				return Alexa::say ( "$userName, please enter your phone number in your account." )->endSession ('false');
			}


		}else{

			$alexaResponse = new AlexaResponse();
			$delegate = new Delegate();
			$delegate->getType();
			$delegate->toArray();
			$alexaResponse->withDirective($delegate);
			$alexaResponse->endSession('false');
			return $alexaResponse;
		}
	}
}
In this function, firstly user will be authenticated. After successful authentication, get user’s phone number from database. If phone number exists then message will be sent to the specific user name’s phone number. If phone number doesn’t exist then Alexa will say “
After that, call your custom skill by invocation name. Then call the message intent by saying “Send message”.