Account Linking In Alexa Custom Skill (in Laravel)
Account linking in alexa custom skill is a process when you link your web service user account with alexa user account. In this process, web service system generates an access token which is used to identify the user in web project uniquely. After that, token will be sent to alexa and alexa stores this token. Each time when request is made, it include that token to request for authentication.
There are two types of Authorization Grant Type:
1. Implicit Grant
2. Auth Code Grant
The main difference between these two methods is how to get access token from your end. In this post, I will explain how to configure “Implicit Grant” method for account linking.
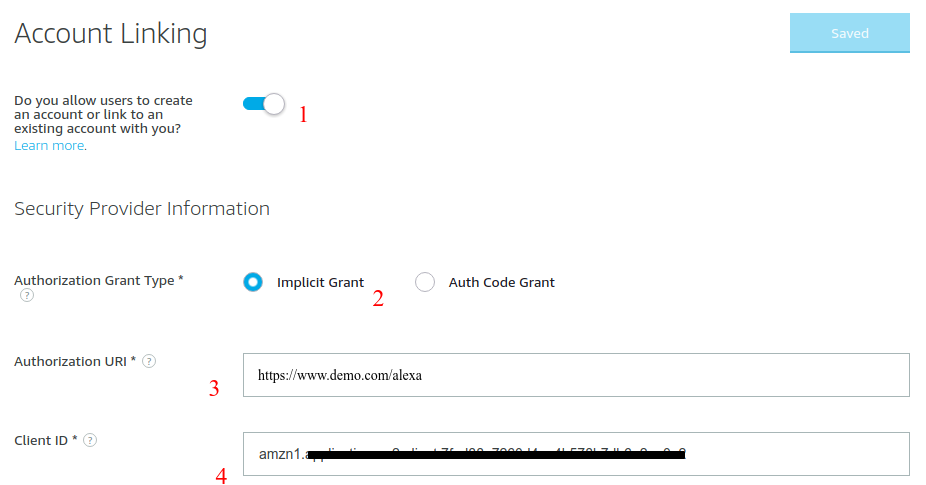
Step 1: Open account linking page from your custom skill menu and follow the below steps:
1. Check/Toggle “Do you allow users to create an account or link to an existing account with you?” checkbox button.
2. Then select Implicit Grant method to authenticate.
3. Add “Authentication Uri” which is a URL from you web service to authenticate alexa user with user at your end.
4. Add Client id which is the id of your security account.
Step 2: Enable alexa skill from the alexa account. After enabling skill, it will redirect you to the url which you have defined in above step.This url includes some variables which are listed below:
1. state: is used by the Alexa service during the account linking process. Your page needs to keep track of this value, as you must pass it back later.
2. client_id: is a value defined by you when you set up account linking for the skill in the developer portal.
3. respose_type: is always “token”.
4. scope: is an optional list of access scopes indicating the level of access requested. You define the set of scopes to support when enabling account linking for your skill.
5. redirect_uri: is the URL to which your service redirects the user once the user is authenticated.
Step 3: In web service, create two functions and routes to get parameters when alexa skill redirects to web url and generate access token.
Alexa Get Routes
Route::get ( '/alexaLoginPage', 'API\AlexaController@alexaLoginPage' );
Controller Function:
/**
 * Login page view.
 */
function alexaLoginPage(Request $request) {
	return view ( 'alexa.login' );
}
Login form view file:
<form class="login100-form validate-form " method="POST" action="{{ route('alexaLogin') }}">
    {{ csrf_field() }}

	<input type="hidden" name="client_id" value="{{ $_GET['client_id'] }}">
		<input type="hidden" name="response_type" value="{{ $_GET['response_type'] }}">
			<input type="hidden" name="state" value="{{ $_GET['state'] }}">
				<input type="hidden" name="redirect_uri" value="{{ $_GET['redirect_uri'] }}">
					<div class="wrap-input100 validate-input m-b-26" data-validate="Email is required">
						<span class="label-input100">Email</span>
						<input id="email" type="email" class="input100" name="email" value="{{ old('email') }}" autofocus>
							<span class="focus-input100"></span>
						</div>
						<div class="wrap-input100 validate-input m-b-18" data-validate="Password is required">
							<span class="label-input100">Password</span>
							<input id="password" type="password" class="input100" name="password">
								<span class="focus-input100"></span>
							</div>
    @if ($errors->has('email'))

							<span class="help-block">
								<strong>{{ $errors->first('email') }}</strong>
							</span> @endif @if ($errors->has('password'))

							<span class="help-block">
								<strong>{{ $errors->first('password') }}</strong>
							</span> @endif

							<div class="wrap-input100 no-border-bottom">
								<div class="txt1" data-toggle="collapse" data-target="#demo">
									<h6>Forgot Password?</h6>
								</div>
								<div id="demo" class="collapse">If you forgot your password, please go to https:https://testskill.us/, and reset your password from there. </div>
							</div>
							<div class="container-login100-form-btn">
								<button class="custom-button">
                                Login
                            </button>
							</div>
						</form>
Then the user is logged in using his website credentials.
Web service authenticates the user and then generates an access token that uniquely identifies the user in your system. After that, web-service redirects the user to the specified redirect_uri and passes along the state, access_token and token_type in the URL.
Note that, parameter “token_type” value is always “Bearer”.
Alexa Post Routes
Route::post ( '/alexaLogin', 'API\AlexaController@alexaLogin' )->name ( 'alexaLogin' );
Controller Function:
/**
 * Login request for authentication.
 */
function alexaLogin(Request $request) {
	Log::info ( "Alexa Login request-" . serialize ( $request->all () ) );
	$validator = Validator::make ( $request->all (), [
			'email' => 'required',
			'password' => 'required'
	] );
	if ($validator->fails ()) {
		Log::error ( 'Validation error message on login alexa : ' . $validator->errors () . '. User details : ' . print_r ( $request->all (), true ) );
		return redirect ()->back ()->withErrors ( $validator )->withInput ();
	}
	if (Auth::attempt ( ['email' => request ( 'email' ),'password' => request ( 'password' )] )) {
		$user = Auth::user ();
		$token = $user->createToken ( 'MyApp' )->accessToken;
		$url = $request ['redirect_uri'];
		$state = $request ['state'];
		return redirect ( $url . '#state=' . $state . '&access_token=' . $token .'&token_type=Bearer' );
	} else {
		return redirect ()->back ()->with ( 'status', 'Credentials do not matches our record.' );
	}
}
The Alexa service validates the returned information and then saves the access_token for the Alexa user.
After that, a message will displayed that “<YOUR_SKILL_NAME> has been successfully linked.” and the skill is ready to be used.
Hi Dalbir Kaur, your article is so helpful, i am new to aleexa skill build skil for our product but i am not able to intigrate or link this skill with our product , i am uing python for lambda function so how i can do that in python can you lease guide me ?
Neha, you can refer to below links to build a skill using Python-
https://developer.amazon.com/en-US/docs/alexa/alexa-skills-kit-sdk-for-python/overview.html
https://chatbotsmagazine.com/how-to-develop-an-alexa-skill-in-under-10-minutes-8f288e26ba29
https://moduscreate.com/blog/build-an-alexa-skill-with-python-and-aws-lambda/
I hope this helps.