Power BI is a powerful tool for creating interactive reports. Sometimes, you may want to make your reports more interactive by adding clickable links that take users to external pages. For example, you might have a table in Power BI that includes a parameter_id, and you want to create a link that, when clicked, takes the user to a Python page showing results based on that parameter_id. In this blog, we will show you how to add a WEB URL column to your data model and create clickable links in Power BI that lead to a Python page.
Suppose:
You have a table called details_table that includes a parameter_id column. You want to create a link in the table that redirects users to a Python page, where the parameter_id will be passed as a parameter to show specific results for that code.
Steps:
1. Understand the API URL Structure
The URL you want to create will look like this:
Api_url = "https://api.example.com/get_details/" & details_table[parameter_id]
This means that for each row, the URL will be built using the parameter_id value, and when the link is clicked, it will take users to the Python page with that specific parameter_id in the URL.
2. Load Your Data into Power BI
Start by importing your dataset into Power BI. Make sure your table has the parameter_id column.
- Open Power BI Desktop.
- Click on Get Data and import the table (details_table).
- Ensure that the table includes a column called parameter_id.
3. Create a Custom Column for the WEB URL
Next, you need to create a new column in Power BI that will contain the clickable URL. To do this, use Power Query to build the URL based on the parameter_id.
Here’s how:
1. Open the Power Query Editor:
In Power BI, click Transform Data to open the Power Query Editor.
2. Create a Custom Column:
In the Power Query Editor, go to the Add Column tab and select Custom Column.
In the formula box, write this formula to create the URL:
let
api_url = "https://api.example.com/get_details/" & [parameter_id]
in
api_url
This formula combines the base URL with the parameter_id from each row.
3. Name the Column and Apply Changes:
Name the column something like WEB URL.
Click Close & Apply to load the changes back into Power BI.
4. Set the Column Data Type to WEB URL
Now that you have the URL column, you need to tell Power BI that this column contains clickable links.
- Click on the Data tab in Power BI.
- Select the column you just created (WEB URL).
- In the ribbon, under the Modeling tab, click on Data Type and select WEB URL.
This ensures that Power BI will treat the column as clickable links.
5. Add the WEB URL Column to a Table Visual
Now, you can add the new URL column to your report and make it visible as a clickable link.
1. Add a Table Visual:
In Power BI, select the Table visual from the Visualizations pane.
Drag and drop the parameter_id and WEB URL columns into the table.
2. Customize the Table:
You can adjust the table appearance, such as sorting or formatting the columns, to fit your report’s needs.
6. Set Up Your Python Page
Next, you’ll need to create a Python page that can handle the parameter_id passed in the URL and display the result. For this, you can use a simple web framework like Flask.
Here’s an example using Flask:
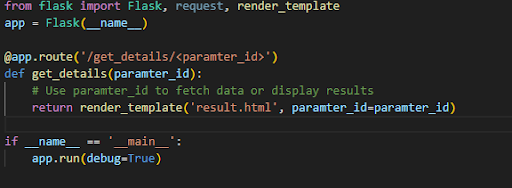
In this example:
- The URL pattern /get_details/ captures the parameter_id from the URL.
- The parameter_id can be used to fetch data or display specific results.
7. Test the Links in Power BI
After setting everything up, you can test the links in Power BI:
1. Click on a Link:
In the Power BI table, click on any URL in the WEB URL column. It should open the Python page with the correct parameter_id in the URL.
2. Verify the Result:
The Python page should now show results based on the parameter_id. You can display relevant data, fetch it from a database, or run any logic needed.
8. Publish and Share Your Report
Once you’ve confirmed that the links work as expected, you can publish your Power BI report to the Power BI Service. The links will still work in the published report, and others can interact with it.