Salesforce offers an Email Service feature that allows you to integrate third-party applications with Salesforce for email processing. Salesforce provides several APIs (Application Programming Interfaces) that developers can use to integrate email functionality with third-party applications. These APIs allow you to send, receive, and manage emails programmatically within the Salesforce ecosystem. Third-party applications can use Salesforce Email functionality in different ways, such as REST API, SOAP API, Apex Email Services, etc.
When third-party applications use the Salesforce Email service, you might face different issues. One of the issues is the Sender Email address issue. While using the Salesforce Email functionality, the sender appears with additional information in Gmail such as
John Smith via K9cvtv787flskx87.5gsyi6d.6g-d1wweas.ee719.bnc.salesforce.com.
In general, Gmail users expect the sender’s name and email address, but he/she sees the ‘via’ in the From Field.
This issue is not a Salesforce Email functionality issue, but part of Gmail security.
When Gmail detects that an email was sent via another mail service, it can trigger additional security measures or warnings to alert the user about the potential risk associated with the email. This feature is part of Gmail’s ongoing efforts to enhance email security and protect users from phishing attempts and other online threats.
In simple words, it indicates the email was sent through another mail service instead of the person sending the email and the indication information is in the format of “via (Interchangeable ID).d.bnc.salesforce.com”
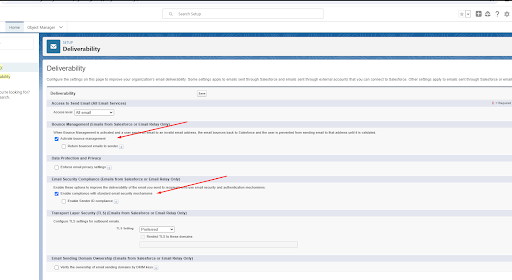
The simple and quick way to display the sender address instead of *bnc.salesforce.com is to change email Deliverability settings in Salesforce. This setting can be changed by a Salesforce system administrator. For this, you need to find the Deliverability in the Search box of Salesforce Setup. You will find two checkboxes: ‘Activate bounce management’ and ‘Enable compliance with standard email security mechanisms’ as shown in the screenshot below. Unmarking these checkboxes will correctly display the sender’s information.
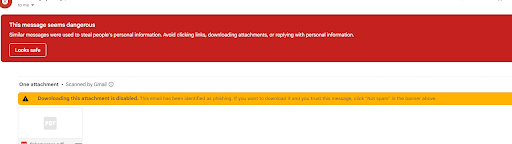
With this approach, although you may see the sender’s address correctly, this email is treated as a potentially dangerous email, and it will be routed to the Spam Folder.
This approach is not recommended and Salesforce suggests another approach which is the best practice to send authorized emails is combining DKIM (DomainKeys Identified Mail) signing with an SPF (Sender Policy Framework) record and this can be used to address the sender issue correctly.
You can generate a DKIM key within Salesforce to sign outgoing emails. This key adds a digital signature to your emails, allowing the recipient’s email server to verify that the email originated from your domain and hasn’t been altered in transit.
An SPF record is a DNS record that specifies which IP addresses are allowed to send emails on behalf of your domain. In the case of Salesforce, you would need to add SPF records to your domain’s DNS settings, specifying the IP addresses of Salesforce’s Mail Transfer Agents (MTAs) as authorized senders.
Combining DKIM and SPF provides a strong mechanism for email authentication:
- DKIM verifies the authenticity of the email’s content and ensures it hasn’t been tampered with.
- SPF verifies the sending server’s identity by checking if it’s authorized to send emails on behalf of the sending domain.